Showing posts with label tackle. Show all posts

Tuesday, 6 September 2011

making lead weights the easy way

The evolution of the process of making cheap leads, lots, quickly.


You can purchase aluminium moulds but they have limitations, they are expensive and generally produce one or two at a time, they make 'professional looking' weights but it takes forever to make a batch of several dozen

Leads are not to be judged on their aesthetic properties but on their ability to give enough weight to cast a baited trace and to hold it on the bottom... so home made, rough and ready....and cheap.... leads will do the job.
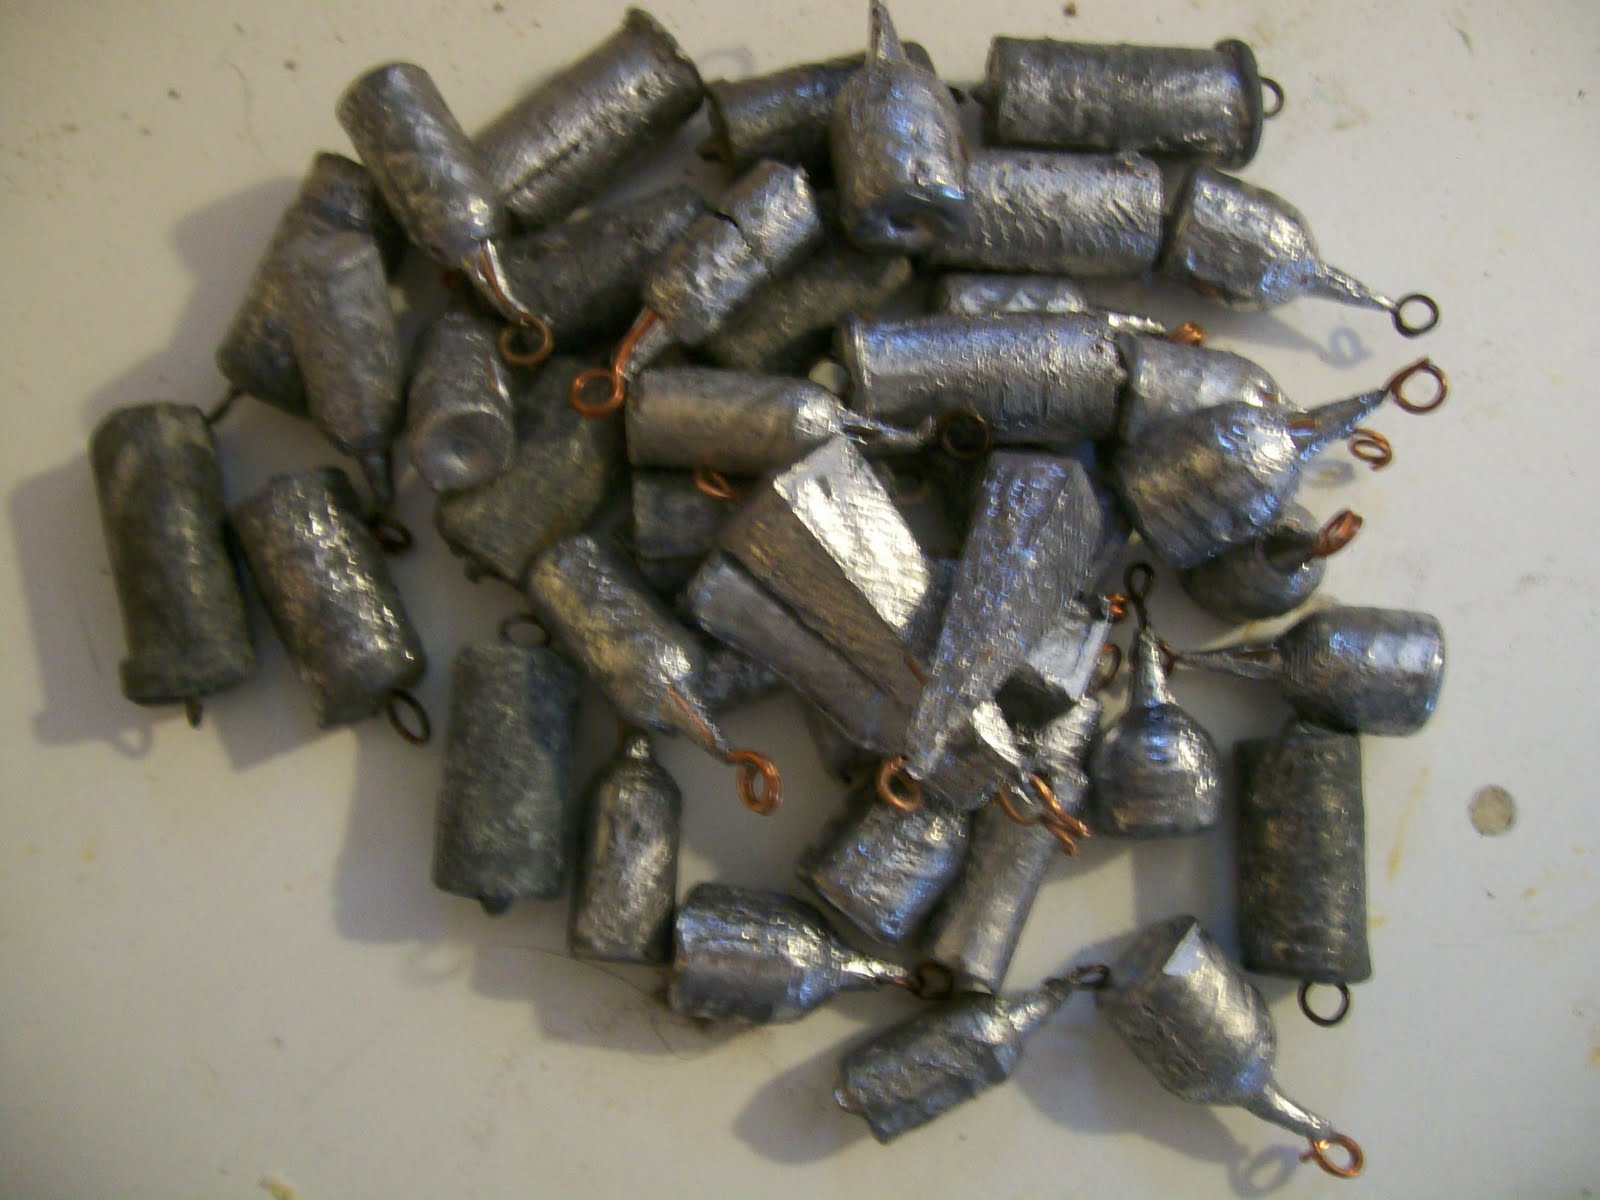
lead weights, cast in wooden moulds

Many years ago we decided to go fishing but had only a few weights and tackle shops were shut... so a quick think and the use of tools to hand resulted in the first 'cast in wood' weights.

Many people have told me that you cannot do this, 'the wood will catch fire', but you can.... and it doesn't. You will note in life that the 'you can't do that' types are the ones who haven't tried it.... and the 'yes you can' types are the ones who have.

A few minutes with a flat-bit in an electric drill drilling into pieces of timber, some copper wire stripped from an off-cut of electric cable and some lead melted in an aluminium milk saucepan with a blowlamp solved the problem. The holes were drilled with the wood on a concrete floor so the drill broke through the wood to give a small hole; twisted wires were put in the holes,the wood levelled up and the molten lead was poured into each hole. Some smoke ensued but no flames, so far, so good. When cool the wood was split open to reveal the leads, we made dozens of a three ounce version and they lasted us a good while, such is the nature of fishing that if you have plenty you seem to lose very few.
Somewhere I have a photograph, will add it when I find it.  update, have found one of the original leads


Now that species hunting has taken over most of my fishing I am once again turning to this way of making leads. Leads are consumable items and, although small one (28g) and two ounce (56g) weights are relatively cheap the losses during a session fishing in weedy or rocky places can put a dent in your wallet.

So, back to the wood, drills and a bit of thinking. The destruction of the simple mould each time was no real problem...the wood used was off-cuts of no value and twenty or thirty leads were made from each piece. Experiments since have shown that when cool the wood can be whacked down hard and the leads will emerge from the hole.... obviously the smoother the hole the more easily the lead will come out....it turns out that the more leads you make the more the wood chars until a layer is built up, this makes the extraction of the leads far easier and a couple of whacks soon shifts them.


one ounce lead, mould drilled with 9mm twist drill

The next session was to make some ounce leads, a 9mm twist drill was used this time and the holes drilled into a pair of pieces of 2" x 1" timber so that instead of splitting the wood the mould could be parted along the centreline and the mould reused...this worked well and many 1 oz ( about 30g) leads were made.
coke bottle shaped leads

Having the need of heavier weights, but having no bigger twist drill, the mould was modified by wiggling the drill from side to side to enlarge the hole, this resulted in some interestingly shaped 'coke bottle' leads. This enabled the production of loads of larger weights, 45 g , but at the cost of ruining the mould for making the smaller weights. It is a bit of a fiddle inserting the wires each time and reassembling the mould.... also the enlargement of the wire hole by constant use increased the risk of the molten lead escaping through the bottom of the mould; with the right sized hole the lead 'freezes' on contact with the copper wire and prevents any run out although there are gaps around the wire.

So the next stage was a re-think... put the wire loop in from the top ?


putting loops in from the top

Two lengths of 2" x 1" planed timber were drilled with a 16mm flat-bit, the lead poured into the holes and the twisted wire dangled into the molten lead on an aluminium nail placed across the hole and resting on the wood.
This worked well and the resulting lead of about two ounces has a sharp edge that grips into the sand or silt, they grip surprisingly well if you tighten the line...and will roll in the current if you don't.
These weights are fine for smooth ground fishing but snag on rough ground, as they are cheap to make that is not such a problem when using a rotten bottom ( attaching the lead with a lighter breaking strain line than your main line so that the lead is lost when it breaks rather than the rig or the hook-length with the fish on it. )

So it was thinking cap on again to make a lead with a smoother 'nose end' that would pull through weed without too much snagging.

pictures tells it all

An impending species hunting visit to the species rich snag pit of Hobb's Point made it necessary to come up with a better way.
To make a rounded nose the flat bit drill had to be made rounded, careful application of an angle grinder gave the required profile, the purchase of a pillar drill since making the other moulds gave the facility of drilling a smoother hole to an exact depth; the point of the drill could be brought to within a smidgeon of breaking though... a baiting needle the same diameter as the copper wire was pushed then through to make the final breakthrough.
Link16mm bit, 48g lead

12mm bit, 28g lead

Experience showed that the last holes were best not used as you need some spare at the end to whack onto a hard surface, as the copper wire is not doubled and twisted the leads come out fairly easily, and as said before, more use made for easier removal. The tails of copper wire are easily wrapped around a nail and trimmed with snips to make the loop ....although you will get sore fingers if you do 200 at a stretch....
The copper wire in this case is stripped from an old length of cooker wiring cable, scrounge some offcuts from an electrician or keep an eagle eye on builders skips.
The 12mm drill gave a weight of pretty near the ounce and the 16mm drill a weight of about an ounce and a half...

Trying to be clever........


I did take a tenon saw and chisel to pieces of wood to investigate making a tapered square section lead, it worked but I am unsure as to the benefits of that shape over the easier to produce round leads.... we will see............


The leads produced weighing 30g not bad for an estimate of 'about an ounce ( 28g)... good guesswork.


We will experiment further to see about making heavier weights at some time, obviously the bigger the lead the more heat has to be dissipated on cooling, this could mean the possibility of conflagration of the mould..... we will see...

Time for a disclaimer, we are sensible grown ups and suffered no death or even injury, we were careful to put plywood splash guards to protect against over enthusiastic filling, we had a bucket of water nearby to cool any burn sustained but kept all water away from the molten lead. We used an oven glove when holding the handle of the aluminium saucepan and added only dry lead to the melt..... and we worked outside in the fresh air to avoid being made crazy by the fumes from the lead.
I take no responsibility whatsoever for any harm that may befall you if you do something silly and hurt yourself or others after reading this.
Safety glasses would be a good idea as well as having immediate access to a bag of frozen peas... a burn will be far less of a problem if the heat is removed quickly from the affected area, cold water immediately then a frozen pack against it to quicken the cooling, common sense works better as you don't get burnt in the first place.


Thursday, 14 April 2011

Tackle Shops, Weymouth


Weymouth Angling Centre has moved from one side of the bridge to the other.... go over the bridge towards town, round the bend with the pedestrian crossing and it's just down the road on the right....although all you can see of it is the name painted on the balcony that projects over the pavement until you are quite close.


Weymouth Angling Centre, St. Edmund Street. Weymouth Tel. 01305 777771

Weymouth Angling Centre.


A new tackle shop has opened, filling the gap left by the demise of Dennings Tackle
, which will be convenient for those heading towards Ferry Bridge, Chesil Cove or the Portland marks.

You will find it on the left as you drive out towards Portland, after the roundabout and after the Filling Station on Portland Road, there is very limited parking in front of shop but you can park on the roadside further down or in a side street.

Chesil Bait 'n' Tackle 77 Portland Road Wyke Regis Tel 01305 766222
Chesil Bait n Tackle, Wyke Regis.


Monday, 22 September 2008

Tackle, Setting up a standard sliding float.


A standard sliding float set-up


Fish will be caught at various depths and to catch them you will need to adjust the depth at which you present your bait. Trial and error will be needed so the length of line between the float and the bait needs to be adjustable.... hence the sliding float.
To set up the standard kit that you will get from the tackle shop put the parts on to your line in this order, bead, float (coloured end first ), ball weight, bead and then the swivel. Tie up a hook length, about 30 to 40 cm long and attach this to the lower eye of the swivel by putting the double overhand loop through the eye and then passing the hook back through the loop and pulling up tight.
The stop to prevent the bait and weight sinking right to the bottom is formed by the small elastic band you will find in the kit; put the band around the line above the float and put one end of the band through the other and pull up tight. If you have large eyes on your rod you can leave it like that.... if the band catches on its way through the eyes you will need to trim off the free end of the band.
You can now slide the band stop up the line to set the fishing depth.

stages in setting up the float stop.


Improved version.

The picture above shows an improvement to the basic set up. A problem with the standard set up is that the sharp edges of the ball weight wear the line away and eventually you will lose your float and weight..... and worst of all, your fish. This variation involves putting the bead and ball weight onto the loop in the hook length, this gives double the line to resist wear, but check frequently and discard and tie another hook length if you see any chafing of the line. You can make life easier for yourself by using a snap swivel ( like a safety pin clip ) instead of the swivel supplied.Experience, or looking to see what other people have done when they catch a fish, will determine the depth you fish at: for mackerel and gar the books usually say about four feet and two feet, but I catch most of mine at a depth of about nine feet for both species. Pollack are found deeper while bass can show up any any depth.

For a cheaper and more versatile set up have a look at my rig here


Tuesday, 20 March 2007

Tackle, "Haddock's Rig"

Component parts of Haddock's Rig.
If you have arrived here from a search site looking to set up a standard float rig then click here, this post concerns a cheaper home-made rig that you will no doubt try when you have lost a few shop bought rigs. I found that when float fishing near to piers and rocks, you will almost always lose floats. The cost of a float is not a lot but alternatives to a shop-bought rig cost a few pence to make and, as it turned out, are more versatile. I quite often want to change from float fishing to bottom fishing and the rig shown allows this change to be made in seconds; un-clip the float and put back in your tackle box, un-clip the weight and re-clip to the snap swivel you have taken the float from and you have a simple running ledger. The float is made some of the spongy foam packing pieces that come with many packaged items.  Use a sharp knife to cut the foam to about five inches long and about an inch octagonal cross section, round the ends and insert a nylon cable tie, clip up the tie and trim off the end. The float you have just made will take a standard one ounce weight. Obviously if you make the float longer and leave it almost square the float will take more weight, up to two ounces. If you are fishing lighter weights then you can scale down the size of the float accordingly.
 Another source of material is a foam kid's swimming aid, called, for some reason a 'noodle', 
I picked up one for a couple of pounds from Lidl, it is about 5'6" long and nearly 3" diameter so there are lots of floats in that ! update: Even cheaper.... I notice Poundland were selling them, they were smaller but priced, as you would expect, at a pound.

The sequence for tackling up is thread up a bead, snap swivel, bead and then tie on another snap swivel. The float goes on the snap swivel that is free to run up and down the line and the weight and hook length loop go on the tied snap swivel.... as easy as that.

A rig set up for float fishing a sand eel.

The depth that the bait will be fished at is determined by the elastic band stop knot; just thread one end of the elastic band around the line, back through the band; pull up very tight and snip off ends, like so..........


The float ( like a traditional a sliding float set-up) can then be set to fish at any depth. If I am fishing a regular spot I will tie a permanent knot as a stop at the known catching depth. Any minor adjustment, a foot or two, can be made simple by changing the hook length which is attached to the same snap swivel as the lead by a double overhand loop. The cunning part of this setup comes when dark falls, snap a starlight ( a small chemical light stick) to activate it and just push it firmly through the foam at the top of the float . The light will protrude at either side of the float and give plenty of light to track your float in the dark. Pollack, bass, scad and mackerel can be taken after dark.  revised June 2021

Tuesday, 13 March 2007

Hooks for general sea fishing.

Hooks for general sea fishing.

Hooks are sized in a traditional and confusing manner. The larger the number the smaller the hook up to size 1, then /0 is added to the number and the bigger the number the bigger the hook, confused yet ?
The smallest hook you will need is a size 4, sizes then go up to
size 3 size 2 and size1, then 1/0, 2/0, 3/0 4/0 and so on. The numbers go on up for hooks to hang on to congers and sharks but a selection from size 4 to 2/0 should suit most types of beach fishing.
There are also many patterns of hook, the most common is the Aberdeen hook which is a good all-rounder although the Nordic Bend hook is perhaps finer wire and sharper. Most of my species hunting fishing is done with size 4 or 2 Nordic Bend hooks.
Use fine wire hooks for targeting small stuff, they tend to be sharper and are plenty strong enough to hold most big fish you come across. Do not use stainless steel hooks, if you cannot remove the hook quickly and easily from a fish that is to be returned, just snip off the hook. The normal fine wire hook will quickly rust away in salt water and little permanent harm is done to the fish. Stainless steel hooks will not rust away. Use small long-nosed pliers or forceps to grip the shank of the hook to remove it.
Keep hooks dry and replace if the hook has been blunted by being caught on stones or rocks. Practice tying hooks and testing how strong the knot is before trusting your early tying practise to a big fish that will get away if you have got it wrong. There is a link to a page that teaches knot tying on the right under 'good sites' and here.
Getting a hook in yourself is painful, take care, if the hook is in deep it will mean a trip to the local casualty department. Do not leave hooks or line lying about, they can cause all sorts of problems with small children and other wild creatures.

Saturday, 10 March 2007

Weights for beach fishing.

Weights for beach fishing.


The size and type of weight to use is determined by quite a few factors;

The weight should anchor the tackle to the sea bed against the force of the current to stop it drifting off down the beach to the annoyance of others fishing nearby or dragging into snags. If there is little or no current such as in Poole Harbour or at Swanage then a small smooth weight will do the job. If the smooth lead is moved by the current then a watch lead (the circular lead with bumps on it ) will give a bit more holding power. In strong currents the grip lead is used, these have grip wires which are held in place by the springiness of the wire. A strong pull on the line will pull the grip wires out of the grooves that hold them and the weight can be reeled in.
The size of the weight will also be determined by the type of fishing you are doing and the safe casting weight of your fishing rod and of the line you are using. For fishing light tackle around piers and jetties you can use small smooth leads, for open beaches in rough weather you would have to use five or six ounce leads to get any hold in the sea bed. The flow of water and wind acts on the line and tries to move the weight, the finer the line the better in this respect and allows the use of lighter weights. Lighter weights are good for at least two reasons, you will be able to feel what the fish is doing as you reel in and a small lead is cheaper to loose than a heavy one.
Sometimes when trying to cast a big bait into the wind you will need to step up the weight to overcome the wind resistance. If there are big waves you may need a bigger weight as you can then tighten the line up more to stop the rod tip moving about as much, making it easier to spot a bite.On some sandy beaches you may get good results by using a ball weight and letting the current wash the lead around to attract fish such as flounder and plaice which are attracted by movement.
Lead is not the deadly poison that environmental fascists say it is; it has been used for millennia for fishing weights. To swallow lead is not a good idea, but then neither fish nor the angler is stupid enough to do that.... especially with the sizes of weights used in sea angling. Washing your hands before eating is a good idea, but as you have been handling smelly worms and fish you would do anyway.
I have fished a few times over rough snaggy ground with a character who, when waiting for a bite, looks around the beach for stones with a hole in them. He ties on a loop of line and uses them as weights, if he loses one, it's just going back to where it came from.
Weights are marked with a number of ounces or grammes, there are about twenty five grammes to an ounce for rough calculation, or about a hundred grammes to four ounces.

update Sept 2011

If you fancy making your own leads I have added a post here


Friday, 9 February 2007

Crabbing.

Crablines, safe type and traditional

Catching crabs is a good introduction to fishing for small children, even the most fretful ankle-biter seems to quieten down when crabbing. You will need, crab line, a bucket that will contain your crabs ( in seawater) for boasting purposes, a long handled net, some bait.... bits of fish, squid pieces, bacon fat and rind all work well, crabs are not fussy eaters. You can buy crab lines from tackle shops and gift shops in any seaside town, these have a line on a winder, a weight, one or two wire booms each with a short length of nylon line and a small hook. A safer and altogether more successful outfit is this; a small drawstring bag of the type used for some washing machine tablets, string and a pebble from the beach to weight the bag. Place some fishy gunge in the bag with the pebble, tighten the drawstring, attach a length of string and there you have a perfectly safe and effective bit of kit for the ankle-biter. The crabs will get tangled in the mesh of the bag and will be most reluctant to let go.
The technique will have to be learned; drop the rig down the side of the wall or pier, wait for a while and gently, gently pull the line up hand over hand with no jerking which will cause the crabs to drop off. As soon as you can, position the net under the crab so that if it lets go it will drop in the net.
Change the water often on hot days and keep the bucket in the shade if you can as warm water will cause the crabs some distress. You will have to learn how to pick up a crab ! They are fiesty creatures and the bigger ones can give quite a nip. Place your index finger on the back of the crab, you may have to distract it with your other hand while you do this; you can then gently press the crab down on its belly with that finger to stop it moving off, then place your thumb and middle finger one on each side of the shell. You can then pick it up whilst it scrabbles about clutching at thin air with its claws. Remember that crabs walk sideways.
There are several different species of crab that you may catch, shown here, the most common is the Shore crab which is green or brown and usually quite small. The Spider crab is a large spiky backed crab with long thin legs, these crabs are right girly things and don't try to nip you like the other types do and usually don't even bother to try to get away. Another type is the Velvet Swimming crab, this type has flattened rear legs to help it swim instead of crawl, then there is the Edible crab and these are sometimes, if you are in the right place, big enough to take and eat. The legal size for taking crabs varies according to the area you are in, usually about 10cm (4") across the shell.
If you are using a line with hooks it is always possible that you will catch a fish, usually a rockling, blenny, pout or similar but occasionally a biggy is caught, A lad had a bass of a couple of kilos in West Bay Harbour last year and I have seen a dogfish and a conger eel caught in Watchet Harbour on a crab line. Another lad caught a dead body on his crab line at West Bay in 2008 but that's another story.